What you'll Need
1. Loreal HIP Shocking Shadow Pigments in Restless
2. Flat Brush
3. Small Angled Brush
4. Eyelash Curler
5. Urban Decay aka UD 24/7 Glide On pencil in Perversion (Black)
6. Urban Decay aka UD 24/7 Glide On pencil in Asphyxia
7. Urban Decay Eye Primer Potion
8. Maybelline Lash Stiletto in Very Black
9. Urban Decay Sustainable Shadow Box
*Some dupes for UD 24/7 Glide on Pencil in Asphyxia
are Wet n Wild Idol Eyes Cream Shadow Pencil in Techno 1.99
and Sephora's Flashy Waterproof Liner in 03 Flashy Mauve 8.00
*Some dupes for UD 24/7 Glide on Pencil in Asphyxia
are Wet n Wild Idol Eyes Cream Shadow Pencil in Techno 1.99
and Sephora's Flashy Waterproof Liner in 03 Flashy Mauve 8.00
Urban Decay's Sustainable Shadow Box
Shall We Begin :)
Always:Start by priming the eye's
*Be sure to apply primer under eye also because you will be applying color there too
Step 1
Using UD's eye pencil in Asphyxia, go over the eye lid an slightly over the crease area- then line around and under eye
Step2
Next Using a flat brush pat on UD's Eye Shadow in "Flash" over the pencil you just applied
*This will make that color really pop and will also help to stop any creasing or smudging from occurring
Step 3
Using Loreal Pigments in "Restless" pat color over the brow bone area *show below while using a flat brush-
HINT= *If you don't have a whitish pigment shadow you can always just use UZI that's in the Sustainable Shadow Box Palette already - And for a bolder white you can add a highlighter to the brow bone first or use a cream eye liner pencil such as Wet n Wild's Idol Eye's Shadow Pencil in "Pixie" :)
Step4
Using a flat brush an the UD eye shadow color in "Oil Slick" apply to crease area *shown below
Tip: Start in crease area, using more pressure an
lifting the brush up at the ends- pull the color oil slick out an upward- This will create a smokey look.
Patting "Oil Slick" over the purple liner will create a Dark purple color rather than just black and will give the eye's an awesome smoked out purple look that is super Hott!- I loves it hehe
Step5
If needed: Add more shimmer to brow bone area using flat brush an Loreal pigment again to help soften edge
*The picture below shows how the shadow will look after softening with flat brush going in a Out and upward motion
Step6
Using UD's eye pencil in "Perversion" Line the upper eye lid- and wing out and upward at the ends. You'll want to line the inside of your waterline also.
Step7
When you are done lining the eye's take a small angled brush an the UD eye shadow color in "Oil Slick" and pat shadow over eye liner- this will help to seal in the color and help it to last longer while preventing some very not needed smudging ;)
Step8
Curl eyelashes and add mascara- I used "Maybelline Lash Stiletto in Very Black"
*This is a great look to apply falsies with for extra drama- I however did not add them yet when taking the pic but falsies are def complimenting to this look ♥
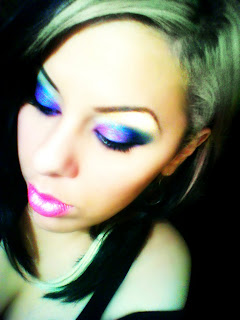
And here is the Finished Product ♥
I hope you enjoyed this tutorial-
Please comment and Follow ♥


6 comments:
Hi. i really love your blog!!! the looks are gorgeous and the photos are amazing. pleaseee post more often. xoxo
Aww Thank you Sweetheart ♥ I'm glad u like it- that really warms my heart :) An I will def try to post more often, Thanks so much for the feedback love xOXo
the colors are so pretty.reminds me of mermaides or peacocks.Love that angle brush.Too cute.x
Thank you hun, I got that one from the Tokidoki collection- 3 brushes for 35 an they are so cute <3
ooohhh I have this pallette <3!
@Jess- I agree, This palette has some awesome colors <3 TY for commenting :)
Post a Comment