Pages

Friday, March 18, 2011

Hard Candy Matte Polish Review


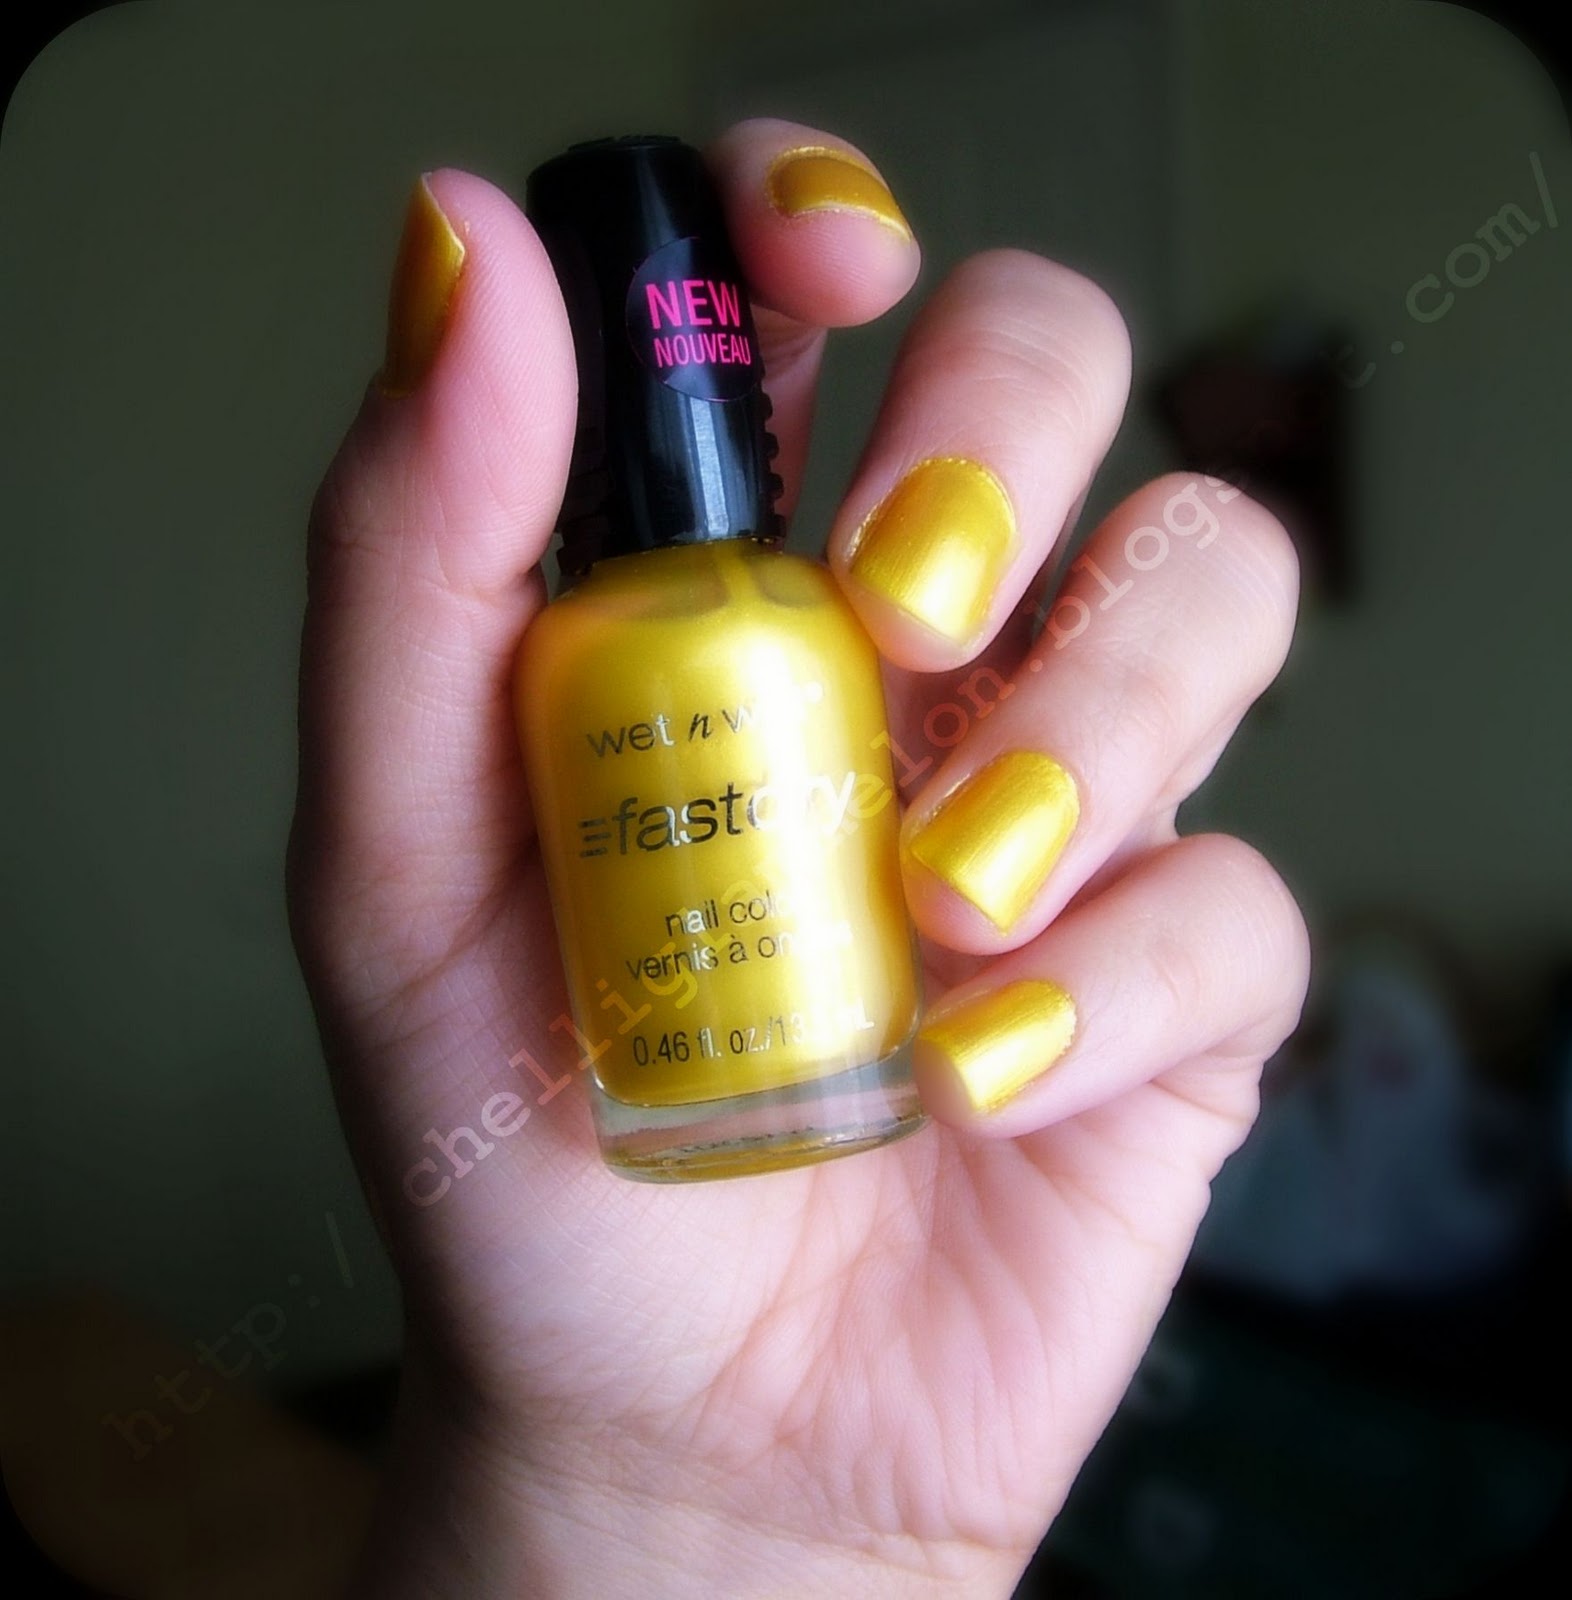
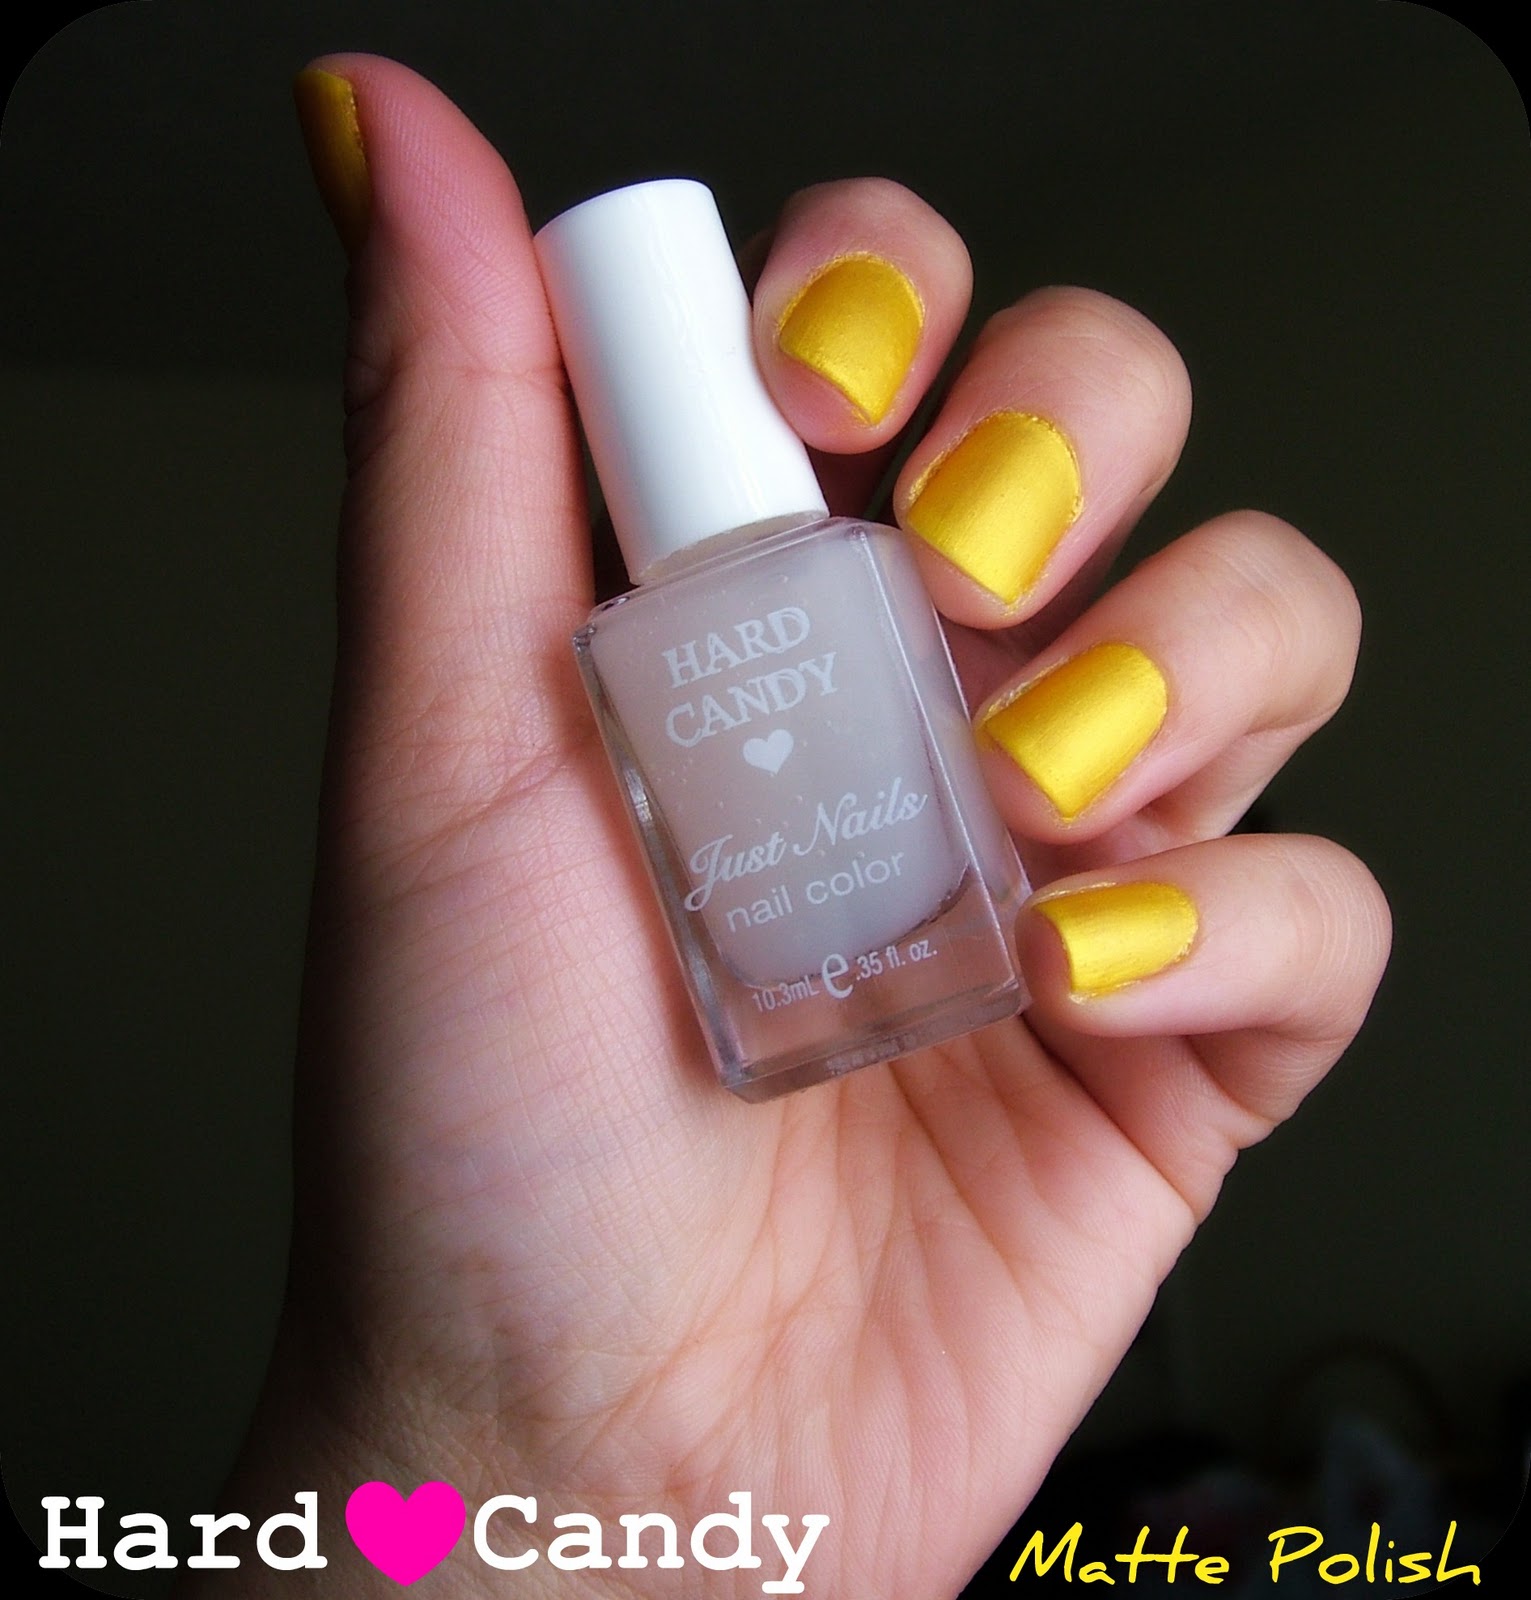
I'm reviewing about the Matte Polish from Hard Candy- I must admit I had never even thought about trying matte polish before and had never even heard of it till around 2 months ago when I came across it at Walmart (5.00 for the bottle) and pretty much just bought it outta curiosity, To see if it really worked and if it could really turn my nail polish matte. I tried it first the day I had bought it and I think I was wearing some medium blue polish then, but honestly I didn't like it- I kept looking at my nails and thinking they looked dull and wanted to coat them with a gloss the whole time haha, So I put it away and didn't bother using it again till I came across it online and decided to give it another try. So I went an bought 2 polishes I thought might actually look good matte. And those 2 polishes were WetnWild's- The Yellow Wonders (1.99) and Sinful Colors Professionals in- Savage (1.99)- (I have not tried Savage with the matte yet) but I did try the WetnWild polish in The Yellow Wonder's with Hard Candy's Matte Polish and here is the Before and After pictures- I'll let you decide if you like it or not.


After trying it again I have changed my mind- I actually really Love the matte polish it just really depends on the color polish you put it over- Think to yourself before you apply, or just try it over one nail to see if it's the look your going for with that particular color. Now I'm excited to try the matte over my Savage color polish, and shall be posting pics of that soon. I should warn you again> that Matte polish Does Not look great on every color polish so be sure you know what look you are going for before you apply over your freshly polished nails : D


Wet n Wild's Fast Dry Nail Color in The Yellow Wonders Review


I tried WetnWilds Fast Dry Nail Polish in The Yellow Wonders  yesterday an I actually really liked this polish, I bought it at Walgreen's for 1.99 which was a great price for fast drying nail polish. It also came out the same color as shown in the bottle and after only 2 coats, it's bright and super glossy looking. The polish dried remarkably fast(Cause I hate hate hate waiting for polish to dry)thus the phrase "It's like watching paint dry" LOL but this one dried so fast I had no problem polishing my nails with it, it seemed like after I'd finish one coat the other hand was already dry and ready for another coat, and because the coverage on it was pretty good- you can do a third coat if you'd like, without even having to worry about wasting time :) 
Now the color is a little bit sheer because it doesn't cover the nail 100% but It didn't bother me at all because it's not like you can see all the details of my natural nail or anything LOL So I was fine with that. If your thinking of trying a bold bright polish for the spring def check out WetnWilds The Yellow Wonders, I liked it a lot : )


Pros
Dries Fast
Great Bright Color
Very Shiny
Great price
No bubbles or weird thickness
No blotchy areas
Smooth application
Haven't chipped yet ; )


Cons
Kinda sheer coverage


I would def buy this again- Honestly I am going to be looking at the wetnwild fast dry polishes again very soon for other colors to add to my collection 


Thursday, March 17, 2011

Scunci No Slip Grip Hair Bands Review


While on one of my quick runs into Walgreen's I began having one of my Regular "I Need to by Something-Anything!" Moments LOL an came across these hair bands- They are from the brand Scunci and are No Slip Grip Head Bands, they come with 4 head bands, 3 are translucent- the blue, pink and green but the black one is not. I found these bands on clearance for 1.19 and wanted to give them a try because I'm always having trouble with my head bands staying on my head and not sliding up (that looks ridiculous) so after wearing these ones-
Here are my thoughts:

Pros
- Came in 4 great colors
- Did not slip
- Are great for when your doing your makeup, jogging etc.
- Are soft yet just sticky enough to hold
- Great Price
- Can be used as a beret also


Cons
- They are a little big so they didn't hold that tightly on my head (I dunno if my head is just small or what?) LOL


I should mention that I noticed these hold much better (for me) when I had a little hairspray in my hair just to cut some sleekness off of the strands giving the grip a much better hold, They also hold better when your hair is down because your hair can help assist them from sliding up in the back.


*I rated these 4 hearts, because they didn't fit tightly around my head


Questions, Comments and Feed Back Is Always Greatly Appreciated
Thank you Hot Chicks : )

Broadway Nails Nail Dress Review


So I tried Broadways Nail Dress Stick on wraps for the first time the other day and wanted to give my thoughts on the product- I usually see the one's at Walmart or Walgreen's by Sally Hansen Salon Effects nail polish strips that are like 10 dollars a box and I never wanted to pay that much for some one time use nails- so when I seen these ones on clearance at Walgreen's for 2.19 I decided to give them a try- Now I'm not sure how well the Sally Hansen ones work so all I can really review is this particular brand but I must say they are Hmmmm okay- and here are my reasons


Cons
-They didn't cover my nails all the way
-They only lasted 3 days long and not the so called (10 days they claim) 
-They started peeling in chunks at the tips after only 2 days of wear
- They didn't seem to stick down all the way and I found myself having to hold my thumb over the nail with lots of pressure to get a good hold
- The wrap folded at the tips because the wrap didn't fit all the material toward the narrow ends
- Not many design options for this brand


Pros
- I didn't have to wait for my nails to dry
- There is no need to worry about making a big polish mess
- There is no -around the nail clean up afterward
- You can easily apply these with your left hand to your right hand 
- The design was cute
- I applied these while facebooking without having to worry about tapping my nails on the keyboard an them getting smudged : )
- You can polish the wrap in any design you want and then apply them to your nails afterwards
- No stinky polish smell, so it's safe to use around newborns and babies


Will I buy these again- Hmmm yeah but only if they are on clearance and only for a like spare of the moment time when I'm in the car and my boyfriend is driving and were headed to a party and my nails look like crud LOL or I'm gonna be having a Christmas party etc and I don't have time to sit and wait for my nails to dry in between multi tasking etc. Yeah that's probably when these bad boys would come in handy. 


Oh and I should mention that after I put on the wraps I didn't really care for the plane metallic metal design they came in, so I decided to polish a design on them and liked that looked Sooo much better then the original- Check it out


I would have to rate this particular brand and product a 2 1/2 hearts because their were just too many little problems during and after with the nails with peeling, fitting, and the lasting wear etc.


If you have tried this product out please leave me your take on it and Whether or Not you would consider buying them again.
And what product similar to this one you've tried and liked much better- 
Thank you for your feedback Glammi Girls <3

Wednesday, March 16, 2011

Purple and Silver- The WOW eye : )


Here are some of the products I used to create this look


Urban Decay Sustainable Shadow Box


Wet n Wild Idol Eyes Cream shadow pencil in Techno 


Mac Paint Pots in Soft Ochre, Rubenesque and Blackground


And for the tools I used the basic 3 eye brushes: Crease Brush, Eye Liner Brush, Blending brush, and a Flat brush


and of course your basic eye essentials 


Black Eyeliner Gel by Loreal Hip 


And Stiletto Mascara in Blackest Black


Okay let's start with- 
Adding primer from crease to brow bone with Soft Ochre, and adding primer from inner eye lid to crease an center of eyelid with Rubenesque, and then adding primer in Blackground using urban decay's blending brush in the V of eye area 
picture shown below for example-


Now take Flash (Reflective Deep Bright Purple) from The Urban Decay Sustainable palette use your Flat brush and Pat Pat Pat color over Blackground (black Primer) -Do not swipe color over because we want this color to go on bold- until all the black primer is purple -avoiding other lighter areas of eye


Take your Crease brush and blend the end purple shadow with UZI until Smokey looking- Don't blend too far up- you want to keep that brow bone bright and sparkley


Now fill in the V area of eye again but this time using Wet n Wilds Idol Eyes Cream Shadow Pencil in Techno (Iridescent purple)then take Flash from Urban Decay's palette again and pat with flat brush over v-area- and coat the lower lash line area with Techno pencil and pat with flat brush the color Flash again.
This just creates a Bold purple color that reflects beautifully in the light and in the dark- Very cool- this is the Woww factor :)


Now  It's time for liner- using Loreal's black gel eye liner I traced the top of the eye lid not thick but not thin and winged the tip out just slightly- Don't wing this out too far- the tip should not go out further than your eyelashes do.
Then using Oil Slick (Black) from Urban Decay's eye Palette go over gel liner with black shadow- to add extra hold and to liven up that black eyeliner


- Now curl eyelashes and Add Mascara in stiletto  maybe 4-5 coats and you should be good to go- If your a little confused on what color lipstick and blush you should wear with such a bold eye shadow color- I paired mine with soft pink lips and bright pink blush (well blended of course)


And here is your end result- A hip, beautiful and funky purple eye that is sure to impress even the mellowest of people : D


Hope you enjoyed this tutorial- Please Comment- I'd love to hear your Thoughts and input :) Have a Great day Glammies <3